~Bad Habits,
Troubleshooting, Reeds P.1~
I began
playing the oboe in the eighth grade. My band director, wonderful
as he was, just didn't know much about the oboe (unless you're an
oboe player, you're just not going to get all the information you
need from your "Double Reeds Methods Class" that you had
to take in college!). And since I never had the opportunity to take
private lessons, I had acquired a multitude of bad habits.
I spent my entire freshman year trying my teacher's patience while
breaking these bad habits. In my years teaching private lessons, I
have seen these same bad habits in young players. It really is no
one's fault. The oboe is just a finicky instrument!
In addition to bad habits,
one of the most common problems I find is that the oboes are
not working properly. Again-- no one's fault. The oboe has a
very intricate adjustment system, and it doesn't take much for it
to get out of quack-- I mean whack. In the repairs section,
I will tell you the most common problems I have encountered.
And last,
but most certainly not least, are reed
and embouchure problems.
If a student has a bad reed, that's the end of the story-- no matter
how good a player (s)he is, or how good an instrument (s)he has, they
still won't sound very good! In the reeds section, I will give you
tips on how to select a reed.
Hopefully this page will
address some of those concerns. If, however, there are questions
you have that are not answered here, please send me an email!
Bad
Habits
 |
Using
"Forked F"-- The first scale the beginning oboe
player learns is-- you guessed it-- the Concert Bb scale. When
you look at the fingerings for Eb (R1, R2, R3, Eb key) and regular
F (R1, R2, RHF), you will notice there just isn't a way to get
from one to the other without playing an E natural (R1, R2) in
between (unless you have a "Left Hand F" key, which
beginner instruments DO NOT). Oboe players are forced to
use the alternate fingering for F-- the "Forked F" (R1,
R3). Most beginning band music is written in the keys of Concert
Bb or Eb, so the oboe player must use the "Forked F"
most of the time. The problem is, the oboe player usually learns
this alternate fingering as the ONLY "F" they ever play--
even when it would be easier to use the regular fingering for
"F" (for example, when going from "F" to "E"
natural).
|
| Solution--
the best solution is to get a "Full Conservatory"
oboe. This oboe will have a "Left Hand F", which all
but renders the "Forked F" obsolete. If you can't do
this though, the best you can do is remind the student to use
to the "Forked F" only when going to
or coming from a D, Db/C#, or Eb/D#. I have my students mark an
"X" above all "Forked F's". |
Using
the wrong octave mechanism-- the oboe has three different
octave mechanisms. There is the half-hole, the thumb octave key, and
the side octave key. Some oboes also have a "third octave key",
to be used on notes above the High Eb.
The half-hole
is used for fourth line C#/Db, D, and fourth space D#/Eb.
The thumb octave key should be used for fourth space E up to G#.
The side
octave key should be used for A and up.
What happens
most of the time is the student either uses the thumb octave key for
the half-hole notes, or the half-hole for the thumb octave key notes.
If their reed is easy enough, they MIGHT be able to get away with
it, but I can usually hear it. If they are using the thumb octave
key on a half-hole note, the note will probably crack or come out
an octave too low. If they are using the half-hole for a thumb octave
key note, the note will probably sound airy or fuzzy. If the student
forgets to use the side octave key on the high notes, the notes will
either crack or come out an octave too low.
Solution-- this one is just a woodshed problem. They just
have to practice playing the notes with their corresponding octave
mechanism.
Sliding or lifting
the half-hole-- The first finger of the left hand should
act as a hinge on the half hole. Most students will either slide
it up and down, or actually lift it off the key and place it on
the half-hole. Both of these habits just require too much movement
and will slow the player's technique down.
Solution-- I actually take a pen and draw a vertical line
down the center of the pad of this finger. Tell the player to put
this line on the line that separates the main part of the key from
the half-hole, and use this connection like a hinge. They can "swing"
it up for regular play and "swing" it down for the half
hole.
|
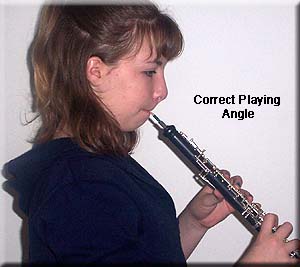
Head
position-- The angle of the oboe to the body of the player
is a small concern, but one that needs to be addressed. If a student
switches to oboe from clarinet, (s)he has a tendency to hold the
oboe too close to the body. While this position is appropriate
for the clarinet, it will cause the bottom lip to pinch off the
opening of the oboe reed. On the other hand, some students will
try to hold the oboe almost parallel to the ground so that they
can insert the reed straight into the mouth. Besides looking silly,
this position will sometimes put too much pressure on the TOP
blade of the reed. Some players will just tilt the oboe-- AND
THE HEAD-- down to correct the angle, but this constricts the
air passage in the throat. |
Solution-- Hold your head
straight and bring the oboe to YOU-- don't go down to the
oboe! The correct angle of oboe to body should be about 45
degrees.
|
| 

|
Left
Hand position-- I notice this to be a problem mostly when
a flute player switches to oboe. Flute players will try to hold
their left hand in the same position they held it for flute. This
bends the hand at the wrist (bringing the palm very close to the
body of the oboe) and causes the fingers to be VERY "crimped"
and tense (see top photo at left). |
Solution--
Straighten out the wrist and pull the palm of the hand away
from the oboe. I tell my students to pretend they are holding
an egg between their palm and the body of the oboe (see bottom
photo above.)
|
Articulating
incorrectly-- There are two common mistakes here-- articulating
with the throat, or tonguing on the roof of the mouth (as opposed
to the tip of the reed). Both of these will sound bad and slow down
technique.
Solution--Tell students to put their tongue on the tip of
the reed (closing off air flow), and blow. While they are blowing,
have them drop the tongue. This should show them what proper articulation
feels like. After that, it is just a matter of reminding them when
you hear them do it incorrectly.
The problems
listed below are some common causes coupled with some common
solutions-- they are by no means the ONLY causes or solutions.
I usually look for these first. Being an oboe player, I can usually
fix these problems with a screwdriver. I do not suggest this for most
people. Adjusting one pad will usually affect another, and then you're
in real trouble. When your oboe needs repair or adjustment I strongly
suggest that you take/send it to an oboe specialist.
I highly recommend Bruce
McCall for oboe repairs. He works out of Rush's Musical
Services in Knoxville Tennessee. I recently sent my oboe to him and
couldn't be happier with the results! It's like an entirely new instrument!
| 
|
None
of the notes on the oboe come out-- There are two trill
key pads above the first finger on the left hand (see T1 and
T2 at left). Most of the time, if no notes are speaking on the
oboe at all, one of these pads is leaking. Leaks can be caused
by torn pads or bent rods. Hold down the pads while the student
plays to check.
Solution-- A quick fix is to simply put a rubber band
around the pad in question, but this is very temporary. Sometimes
the rubber band will start to discolor the silver of the key.
Take it to a repair shop as soon as possible.
|
| |
The notes
on the top joint of the oboe come out, but the notes on the
bottom joint don't-- This is usually caused by a leak
in the pad between the second and third key on the top joint
(see P3 above). The first finger of the bottom joint is connected
to a bridge key. This bridge key opens the pad in question
(finger a third space "C" and you'll see what I
mean). When you press down all the keys of the top joint,
this pad should close. It should stay closed when you press
down the first finger of the bottom joint. If the oboe is
out of regulation though, the pad will open slightly when
you press the first finger of the bottom joint. Sometimes
the opening is so slight you can barely see it, but it's there.
Solution-- This one requires a screwdriver. If you
follow the mechanism from the leaking pad, it will lead you
to a couple of adjustment screws. You can usually close the
pad by turning one of these screws. The only problem is, if
you turn it too far, you'll open another pad on the bottom
joint. If you MUST try to fix this yourself, turn the screw
a little at a time. Play a scale on the oboe to make sure
you haven't caused other problems. I would suggest taking
it to a repair shop or someone who teaches oboe lessons.
The third
line B and fourth line C sound the same-- the pads
(P2 and P3) that lift when you press the first finger of the
right hand (R1) are probably out of adjustment and are not
lifting high enough.
Solution-- This is another one that requires a screwdriver
and involves an adjustment screw. And again, I would send
it to a repair technician.
|
|
The
low E, Eb/D#, D, Db/C#, and C don't speak easily-- This
is usually caused by a leak in the pad P1 at left. This pad should
close completely when you press the E key down (R2).
Solution-- This can be fixed by turning the adjustment
screw attached to this pad. Just press down R1 and R2, and turn
the adjustment screw until you feel R2 start to lift. If it lifts
at all, back the screw up a quarter turn. |
| |
|
The
high notes come out too low when the octave key is pressed--
Sometimes this is just a reed problem. If the opening of the
reed is too wide or if the reed is too hard, it will not hold
the octave. Also, check to see if there is water in the key.
The opening of the octave key is very small and traps water
easily.
Solution--A
good swabbing should fix this. If swabbing doesn't, take the
top joint off, hold your right hand over the tenon cork (to
completely block the air flow) and press all the keys down
with the left hand. Blow really hard, and press the octave
key. This should force any water in the key out.
Reeds
Let's
face it-- oboe reeds are the bane of my existence, and yours
too if you have an oboe player in your band. I can't even
begin to tell you how to adjust a reed if it isn't perfect,
but I can give you some tips on choosing them.
Buy
from an oboe specialist--
When you buy a reed from your local music store, chances are
it is a mass produced, machine-made reed. Chance dictates
that you will get a decent reed every once in awhile. But
more often than not, and correct me if I'm wrong here, you'll
have a substandard reed. And you probably paid over $10.00
for it. Reeds from oboe specialty shops are hand made. Many
offer "student" reeds, or quantity discounts. The
prices range from $8.00 for a student reed to $14.00 for an
advanced reed. Even if the price is higher than your local
music store, you've got a much better chance of getting a
better reed. I would suggest ordering two or three reeds from
different companies, and have your students tell you which
ones work the best.
Look
at the reeds-- If you're in a pinch and MUST buy from
a music store, look at the reed. The finished length of the
reed should be 70 mm (for those of you who carry a ruler around
in your shirt pocket). If it is longer, it will be flat. If
it is shorter, it will be sharp. Also, look into the opening
of the blades. If one blade is flat and the other is curved,
don't buy it. Is the opening too wide? It will be very hard
to play and probably flat. Is it too closed? It will be too
easy to play and probably sharp (and will last about two days).
Hold
the reed up to a light-- Hold it just in front of
the light in such a way that you can see through the blades
of the reed. You can usually spot a crack this way (it will
look like a dark vertical line). You can also tell if the
reed is handmade this way. The machine made reed will start
dark and progressively get lighter.
The
hand made reed will have definite areas-- windows, spine,
rails, a heart, and a tip.

Look
at both blades of the reed. If they don't look exactly alike,
the reed will probably not be very stable, and therefor a
bad choice. Symmetry is everything!
Look
at the sides of the reed-- If the blades do not touch,
the reed will leak. If a student has a leak on the side of
the reed, there are two ''quick fixes". If you happen
to have "fish skin" (it's an oboe supply), apply
that up to the point of the leak. You can also apply a very
light, thin layer of clear fingernail polish up to the point
of the leak. Make sure the polish is completely dry before
playing! Also, check to see if the blades are "slipped"
(one blade to the left or right of the other). Some oboists
prefer slipped blades. The point to slipping blades is to
make sure the reed doesn't leak, but I have found this causes
more problems than it fixes.
Reed
Secret-- If you have a really good reed, but it is
really old and starting to "die", there is a last
resort quick fix. This procedure is highly controversial amongst
the oboists of the world, but hey, it works for me. Here it
is-- Soak the reed in peroxide instead of water. This sort
of cleanses the "gunk" out of the reed, and gives
it one last play before you have to give it the wall test.
It also damages the reed, so it's a "one time, last resort,
desperate move" fix. Use sparingly!

Embouchure
Because
there is no mouthpiece, and the reed is so small, many young
oboists come up with some very interesting embouchures! To
help them achieve the correct embouchure, here are a couple
of tips I give them.
-
Pretend
to whistle. Freeze that position, and put the oboe reed
in the mouth. This sets the opening of the lips in the shape
of an "O". One of the most common problems with
oboe embouchure is that the student "bites" down
on the reed. (S)he has too much pressure coming from the
top and bottom and not enough from the sides. When they
pretend to whistle, it brings the sides in.
-
Pull your bottom lip over your teeth. This one is a little
harder for students to understand. I tell them to curl the
bottom lip over the bottom teeth, as if they are trying
to put the bottom lip in their mouth. Then pull the lip
out and down and stretch it across the teeth. This makes
them "flatten" out the chin. The chin muscles
should be pulling away from the reed, not pushing
up to it.
-
The
teeth should not be too close together when playing the
oboe. If the student is "biting" down, (s)he is
using a "double lip" embouchure, where both lips
are curled across the teeth. The top and bottom teeth are
only about 2 centimeters apart and are biting down on the
reed. The teeth should be further apart, and the not putting
any pressure on the reed. The lips should be the only part
of the body in contact with the reed.
|
|